Introduction
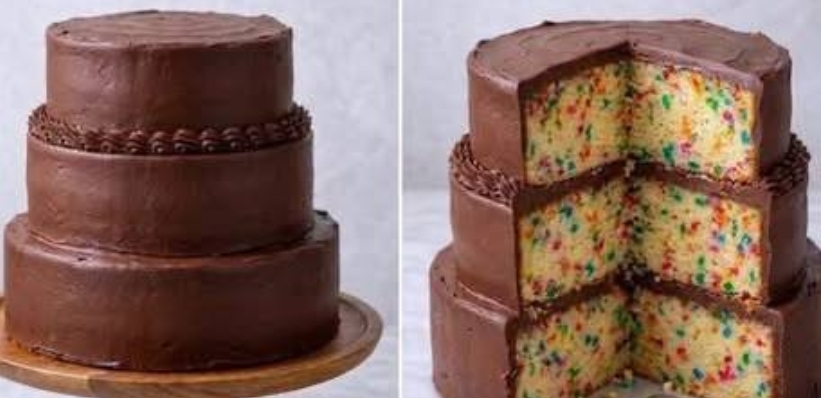
Get ready to sprinkle some serious joy into your next celebration with our Funfetti Layer Cake with Chocolate Frosting! This isn’t just any cake; it’s a vibrant explosion of color on the inside, perfectly contrasted by a rich, decadent chocolate embrace on the outside. Imagine slicing into a moist, vanilla-scented cake studded with a rainbow of sprinkles, only to be met with the luxurious taste of homemade chocolate buttercream. It’s a feast for the eyes and the palate, guaranteed to be the show-stopping centerpiece at any birthday, anniversary, or “just because” party.
What makes this funfetti cake truly special is its ability to evoke pure, unadulterated happiness. The sprinkles baked directly into the batter create a playful confetti effect, making every slice a delightful surprise. Paired with a smooth, intensely chocolatey frosting, this cake strikes the perfect balance between childhood nostalgia and sophisticated flavor. Forget bland desserts; this recipe is designed to deliver maximum impact with every forkful, proving that classic combinations can still be incredibly exciting.
Whether you’re a seasoned baker or just starting your culinary adventures, this detailed guide will walk you through creating a stunning two-tiered masterpiece that tastes even better than it looks. We’ll cover everything from achieving that perfect sprinkle-studded crumb to whipping up a dreamy chocolate buttercream and expertly assembling your cake. Prepare to impress your guests and satisfy every sweet craving with this ultimate celebration cake!
Nutritional Information
Per serving (approximate values):
- Calories: 650
- Protein: 7g
- Carbohydrates: 95g
- Fat: 28g
- Fiber: 2g
- Sodium: 310mg
Ingredients
For the Funfetti Cake Layers (yields two 8-inch and two 6-inch layers)
- 3 cups (360g) all-purpose flour, sifted
- 1 tablespoon baking powder
- 1/2 teaspoon salt
- 1 cup (226g) unsalted butter, softened
- 2 cups (400g) granulated sugar
- 4 large eggs, at room temperature
- 1 tablespoon vanilla extract
- 1 1/2 cups (360ml) whole milk, at room temperature
- 1/2 cup (100g) good quality rainbow sprinkles (jimmie or confetti style)
For the Chocolate Buttercream Frosting
- 2 cups (452g) unsalted butter, softened
- 6 cups (720g) powdered sugar, sifted
- 1 cup (90g) unsweetened cocoa powder, sifted
- 1 teaspoon vanilla extract
- 1/2 teaspoon salt
- 1/2 cup (120ml) heavy cream or whole milk, plus more if needed
For Assembly
- Additional rainbow sprinkles for decoration
- Cake dowels or thick straws (for tiered cake stability)
Instructions
Part 1: Prepare the Funfetti Cake Layers
- Preheat your oven to 350°F (175°C). Grease and flour two 8-inch round cake pans and two 6-inch round cake pans. Line the bottoms with parchment paper.
- In a medium bowl, whisk together the sifted flour, baking powder, and salt. Set aside.
- In a large bowl, using an electric mixer on medium speed, cream the softened butter and granulated sugar together until light and fluffy, about 3-5 minutes.
- Add the eggs one at a time, beating well after each addition until fully incorporated. Scrape down the sides of the bowl as needed.
- Beat in the vanilla extract.
- With the mixer on low speed, gradually add the dry ingredients to the wet ingredients in three additions, alternating with the milk in two additions, beginning and ending with the dry ingredients. Mix until just combined; do not overmix.
- Gently fold in the rainbow sprinkles by hand until evenly distributed.
- Divide the batter evenly among the prepared cake pans. For the 8-inch pans, you’ll likely have about 2 1/2 to 3 cups of batter per pan. For the 6-inch pans, about 1 1/2 to 2 cups per pan.
- Bake the 8-inch layers for 30-35 minutes and the 6-inch layers for 25-30 minutes, or until a wooden skewer inserted into the center comes out clean.
- Remove cakes from the oven and let them cool in the pans for 10-15 minutes before inverting them onto a wire rack to cool completely. Ensure cakes are completely cool before frosting.
Part 2: Prepare the Chocolate Buttercream Frosting
- In a large bowl, using an electric mixer on medium-high speed, beat the softened butter for 3-5 minutes until very light and fluffy. This step is crucial for a light buttercream.
- Gradually add the sifted powdered sugar, 1 cup at a time, mixing on low speed until combined, then increasing to medium-high.
- Add the sifted cocoa powder, vanilla extract, and salt. Mix on low speed until combined, then increase to medium-high and beat for another 1-2 minutes.
- With the mixer on low speed, gradually add the heavy cream or milk, a tablespoon at a time, until the frosting reaches your desired consistency. For a thicker frosting, use less liquid; for a thinner, smoother frosting, add a bit more. Beat on medium-high for 2-3 minutes until light, fluffy, and smooth.
Part 3: Assemble the Tiered Cake
- Once the cake layers are completely cooled, use a serrated knife or cake leveler to level the tops of each cake layer, creating flat surfaces.
- Place one 8-inch cake layer on your serving plate or cake stand. Spread about 1/2 cup of chocolate buttercream evenly over the top.
- Place the second 8-inch cake layer on top. Apply a thin layer of frosting all around the sides and top of the 8-inch base cake. This is your “crumb coat,” which traps any loose crumbs. Chill the cake in the refrigerator for 20-30 minutes to set the crumb coat.
- While the base cake chills, repeat the process with the 6-inch cake layers: place one 6-inch layer on a separate small plate or cardboard round, spread with frosting, top with the second 6-inch layer, and apply a crumb coat. Chill the 6-inch cake as well.
- Once the crumb coats are set, retrieve the 8-inch cake. Apply a thicker, even layer of chocolate buttercream to the top and sides, smoothing it with an offset spatula or bench scraper.
- Retrieve the 6-inch cake. Apply a thicker, even layer of chocolate buttercream to the top and sides of this smaller cake, smoothing it out.
- To assemble the tiers: Insert 3-4 cake dowels or thick straws into the center of the 8-inch base cake, arranging them in a circle slightly smaller than the diameter of the 6-inch cake. Trim the dowels so they are flush with the top surface of the 8-inch cake. These will support the upper tier.
- Carefully lift the 6-inch frosted cake (it helps to use a wide spatula or a second small cake board underneath) and center it on top of the 8-inch base cake, resting it on the dowels.
- Use the remaining chocolate buttercream to pipe decorative borders or swirls as desired. A shell border or rope border around the base of the 6-inch tier and the bottom of the 8-inch tier adds a professional touch.
- Garnish with additional rainbow sprinkles if desired, especially around the base of the top tier or dusted on top.
- Refrigerate the finished cake for at least 30 minutes before serving to allow the frosting to firm up.